
Razer is a well-established brand producing computers and computer-related products. They also produce top-quality keyboards of different categories. But their popularity is the most because they produce the most amazing gaming keyboards. Because of the backlit keys, these gaming keyboards looked fascinating and have become popular in the gaming community.
Programmable macros and durable construction are the other two amazing factors about the Razer keyboard. Many Razer keyboard users ask a common about whether it is possible to remove the switches. If the answer is yes, they next ask how to remove Razer keyboard switches.
Why Do You Need to Remove Razer Keyboard Switches?
Before you do anything, you must be clear about why you are doing that or the purpose of the task. Removing the switches from your Razer keyboard is not any different. Because if you are going to do so, first, you need to be sure about the possible reasons, and removing the switches is the only path left.
If you are wondering if you will swap the older keyboard switches internally, sadly, that’s impossible. The switches of a Razer keyboard are only made for that particular key. You can’t use those switches for any other keys or any other switches on that particular keyboard of yours.
Removing the switches is not ideal for the Razer keyboards. If you are unaware of the process, you might end up damaging the keyboard permanently. So, you need to be sure about the cause for which you want to remove the switches of your Razer keyboard.
What are the Necessary Tools for Removing Razer Keyboard Switches?
As you have made up your mind about removing the keyboard, you are going to require some tools for the process. Now, the necessary tools you are going to need to get the job done are listed below:
1. Screwdriver: You will require this tool to detach the back part of the keyboard to access the switches and then remove those.
2. Switch and Key Puller: To detach the switch and key from the keyboard, you will surely require a two-in-one switch and key puller.
3. Solder Sucker and Soldering Machine: Now, as the Razer keyboards are not hot-swappable, the switches are soldered to the keyboard. As you want to remove the switch, you need to heat the places where the key is soldered. Use the solder sucker there to melt the joint place and release the switch.
Now, when you replace the switch or put a new one there, you need to make sure the switch stays there. That’s why you will require a soldering machine to attach that switch back to the keyboard.
How to Remove Razer Keyboard Switches – The Step-by-Step Process
Now, if you have gathered all the necessary tools that were stated in the previous section, you are all set to go. Now, the steps you need to go through to remove the Razer keyboard switches are as follows:
Step-1: Take Off the Back Part of the Keyboard
Now, as the switches are inside the keyboard, you need to take off the keyboard’s back part to access those. For the job, you will require a screwdriver with which you will have to unscrew all the screws attached to the keyboard’s back panel.
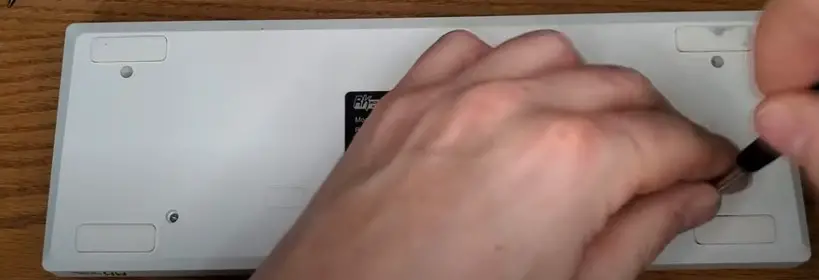
After detaching the screws, you can easily take the back panel off to access the inner section.
Step-2: Locate the Faulty Switch
Obviously, you are not going to remove a properly working switch or don’t want that to happen mistakenly either. That’s why you need to locate the faulty key and confirm the switches of that key by checking from the back panel. You can do the checking task by using a multimeter through beep sound testing.
Once you are properly sure which key or keys are faulty, you can start the switch removal process.
Step-3: Remove the Switch from the Razer Keyboard Carefully
The Razer keyboards don’t have hot-swappable keys, which makes the switch removal task a bit harder. Take the key and switch puller, a two-in-one tool that works as a key puller from one end and as a switch puller from the other end. With that tool’s help, remove the faulty key you have targeted.
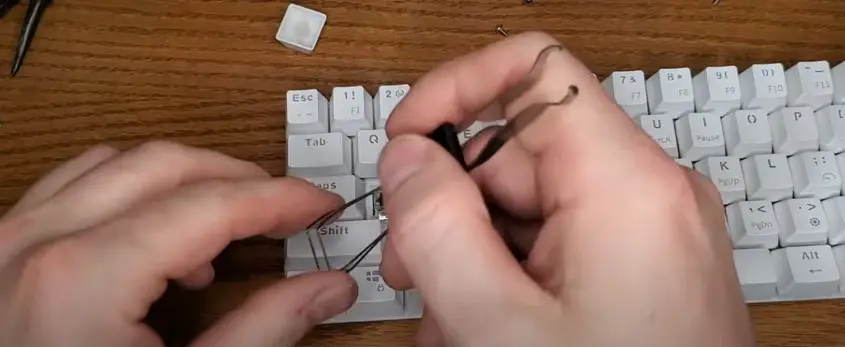
After doing so, go to the back panel of the keyboard where the switch is soldered. Take the solder sucker you have gathered before and use it to melt the soldering. It won’t take long for the solder sucker to melt the old soldering. Probably, the switch would be soldered from the two sides to the back panel.
Melt the soldering from each side to loosen the switch from the keyboard body. After melting the soldering, you need to take that switch plus key puller again in your hands. Place it properly on either side of the switch and make sure it has a proper grip on that switch.
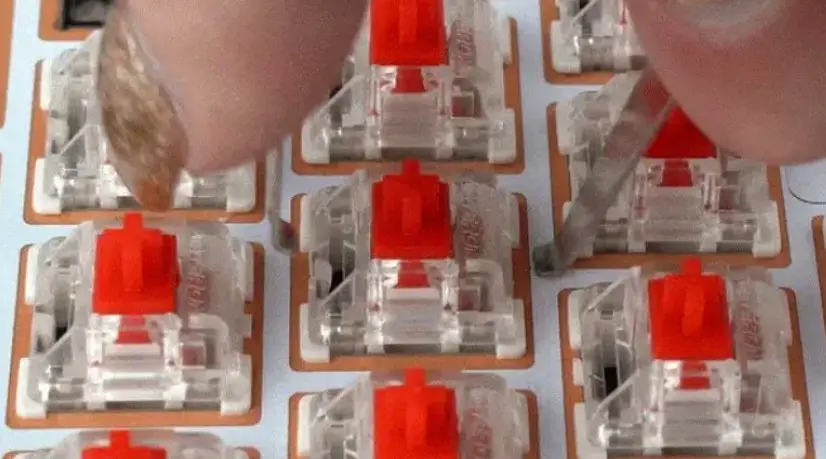
When you are totally sure about that, pull the tool, and the faulty switch will come out with it. Then you can either clean the switch if it is dirty or replace it with another third-party switch of the same type based on your needs.
So, that’s how you can remove the switches from your Razer keyboard, which is not hot-swappable.
Tips While Removing Razer Keyboard Switches
While removing the keyboard switches, some tips can save you time and prevent the keys from getting damaged. The tips which can assist you in this regard are:
- Make sure whether the keys and switches are hot-swappable or not and take necessary steps according to that
- While detaching any key or switch, you must remain careful about not damaging the other keys, switches, or any parts of your Razer mechanical keyboard
- Gather the necessary tools before starting the faulty switch removal process
- Before removing the switch, make sure whether the switch is faulty, or the issue is with the key
- When you are pulling the key, make sure to pull the proper key of the faulty switch and not pull any other keys mistakenly
FAQs
Mechanical keyboards have a longer lifespan compared to the general keyboards we use. In the mechanical keyboard, the switches are also built rigidly with top-quality built materials. Because of that, the switches last at least ten to fifteen years if you are a moderate keyboard user.
But if you are a hardcore user, the lifespan of the switches will be a little less. On the other hand, if you don’t use the keyboard often, it will last a bit longer than average. In mechanical keyboards, sometimes, key switches come with a rating which comes with the information of how many key presses they can withstand.
If your mechanical keyboard’s loud and clicky sound bothers you, you can lessen the sound. Try putting foam or a desk mat under the keyboard for the task. Lubricating the key switches is another method you can apply to make switches less scratchy and lessen sound.
When the methods above are unable to lessen the sound, try replacing the clicky switches of your mechanical keyboard. Instead, use the linear switches, which will produce less sound compared to switches before.
Razer Keyboard Switches
Final Words
You might be a user of the Razer mechanical keyboard, and unfortunately, one of its switches might stop working. Also, dirt and dust can gather between the key and the switches. If these are the cases, replacing the switches of your mechanical keyboard becomes necessary.
To perform the task, you must have the proper knowledge about the process of how to remove Razer keyboard switches. But before doing so, you need to be sure whether the keyboard is hot-swappable or not.

I am a regular user of computer keyboards. For using keyboard face different kinds of problems and also solve it very easily. I love sharing knowledge about keyboards.