
The basic reasons for a Razer keyboard pressing multiple keys can be as trivial as stuck debris and as serious as faulty firmware or Synapse.
Well, no matter what’s the problem, you cannot continue typing if the keyboard keeps on spamming. Before you take your keyboard to the professionals, let’s tell you some fixes that you can practice at home!
Method 1: Unplug and Re-Plug the Keyboard
The first thing you need to try is to plug out your keyboard. When you see the keyboard spamming or typing multiple keys, plug it out. Switch it off and unplug it.
It’s better if you can restart your computer in this position. Once you are done, plug the keyboard in and switch on your computer and the keyboard. Try using the keyboard now. Hopefully, the problem will be solved.
Method 2: Clean the Razer Keyboard
In either case, there can be dirt and debris stuck in your keys and that might be the reason behind the keyboard pressing multiple keys.
We recommend you clean the keys once a month so that no dirt or debris can stick to your keys. Switch off the keyboard and the computer and then start cleaning the keys.
Remove all the dirt and remains with the help of a keyboard brush and try reconnecting it to the computer. Try it out to learn if the problem is fixed or not.
Method 3: Check the USB Port
At times, the Razer keyboard repeating keys might occur for USB port issues. Well, this doesn’t only occur in the Razer keyboard but happens with all of them if there are issues with the USB port.
- In this case, we recommend you get your hands on all the peripherals that are plugged into your PC. Only the primary mouse and the keyboard should be added. Unplug any other devices that are connected to your computer.
- Once you are done, you can start dealing with the keyboard. Here, you need to plug out the Razer keyboard and try to get your hands on another keyboard and plug that in. Check if it is working properly in the other system you just added.
- If you see that the new keyboard is working fine and there are no issues with the keyboard pressing multiple keys, your USB port is faulty. Go for a technician to fix the USB port to solve the spamming keys issue.
Method 4: Update the Keyboard Firmware
When you see that your Razer BlackWidow V3 Mini Hyperspeed double typing and the above-mentioned methods are not working- check the keyboard firmware.
Another reason behind the Razer keyboard pressing multiple keys is a dared device firmware. You must ensure that the device firmware is up to date. For this, you need to go to the Software and Firmware Updates for your Razer Peripherals.
Along with this, it’s necessary to ensure that the Razer Synapse is updated too. The update also includes the computer’s OS update facility.
Method 5: Reinstalling Synapse
When the problem is related to the software, you must check the Synapse. Disabling Synapse and then installing it once again can solve your issue. A full fresh and clean install of the Razer Synapse can be done by following the below-mentioned method.
It will certify that there are no stray files anymore. And if there were any junk that was messing up with the previous install, those will no longer stay too.
Step 1: Uninstall Synapse
To disable Razer Synapse, you have to go to Programs of your Windows. There, you will need to search for the Uninstall or Remove Programs area.
You will see a long list of the programs installed on your computer. Search for the Razer Software. Once you get it, uninstall it. Along with the Razer software, you will find a program called Razer Chroma SDK. When you see it, you need to remove it too.
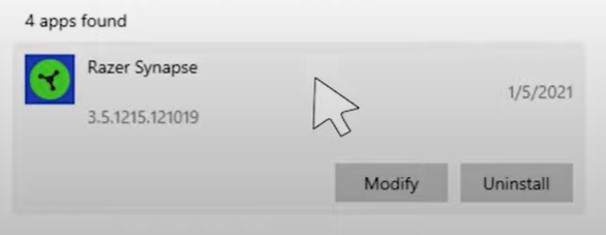
It can also be done via Apps and Features of your computer. Simply go to Apps and Feature and type Razer. The app will appear with an option for uninstallation.
Step 2: Stop Razer Services
After you have successfully uninstalled these two programs from your Windows, you have to reboot your PC. Once the reboot is done, go for Windows Services. If there are any stray Razer services left on your computer, you will see them there.
You need to make sure that there are no stray Razer services; all of them should stop already. And if you see any Razer services there, you have to stop them.
Step 3: Kill Running Razer Processes
Now that the stray services are done, you have to go for the Task Manager of your Windows. At this point, you need to search for the running Razer processes if there are any. If you see any of them, kill them.
Step 4: Delete Razer Folders
When you are done, move to C:\Programs Files. This is where all the installed folders are kept. If you had kept your Razer folder on any other disks, you should go for that disk.
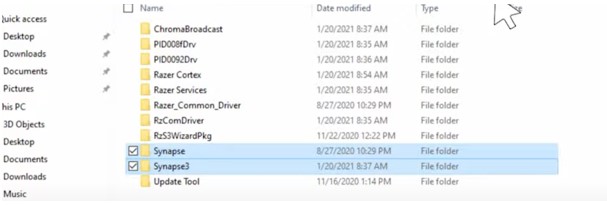
If it is located in C:\Programs Files, go for it first and then search for User or your User Name. Get into it and then find Local inside App Data. There, you will see the Razer folders. All you need here is to delete the folders.
Step 5: Reboot the Computer
At this point, you have already deleted all the files and programs related to Razer Synapse. It’s time to reboot your computer once again. When the reboot is done, you need to download Razer Synapse once again and install it.
Log into it and let it update. After you are done, you must restart your PC once again for saving the changes. And eventually, when the Razer Synapse is reinstalled, you will see that the keyboard isn’t pressing multiple keys anymore!
Wrap up
The Razer keyboard spamming keys might seem too difficult to sort out for these fixes are the best deal you get to save your money. Even the professionals will carry these methods before they get into deeper fixes. Follow our mentioned methods to save your time and money because the methods are worth it!

I am a regular user of computer keyboards. For using keyboard face different kinds of problems and also solve it very easily. I love sharing knowledge about keyboards.